RECIPE;
To make easy home made plant milk yogurt you will need a few ingredients;
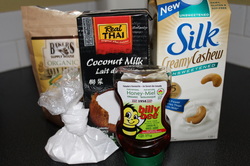
Plant milk 1 litre; anything from almond, hemp, cashew, soy, or coconut.
Thickeners 2 tbsp; tapioca starch, non gmo cornstarch, flax or chia seed (soaked in warm water), agar agar powder, guar gum, liquid soy or sunflower lecithin.
Starter culture; 1/4 cup of high quality plant yogurt, a high quality live (vegan) probiotic 1-2 capsules, or a plant based culture starter 1 packet. Start with less and work up to if you need to add more. unless you like a super tart sour cream!
Protein powder; 2 scoops of any protein powder you like organic pea, hemp, brown rice, lentil, or non-GMO soy. (hemp and brown rice are the least allergenic if those are your considerations.)
To the 1 litre of plant milk that only supplies 1-2 grams of protein per serving, the addition of a plant protein powder adds apx 9 grams of protein per serving, with the 1 gram gained from plant milk per cup (1 serving size) this jacks up the protein to 10 gram per serving, which matches or even surpasses a per serving of dairy yogurt.
Sweeteners; Agave, dates, or stevia, or (honey) are natural sweeteners that I would suggest to add in small amounts to the final product but if you want to add to the recipe remember that less is more.
To make easy home made plant milk yogurt you will need a few ingredients;
Plant milk 1 litre; anything from almond, hemp, cashew, soy, or coconut.
Thickeners 2 tbsp; tapioca starch, non gmo cornstarch, flax or chia seed (soaked in warm water), agar agar powder, guar gum, liquid soy or sunflower lecithin.
Starter culture; 1/4 cup of high quality plant yogurt, a high quality live (vegan) probiotic 1-2 capsules, or a plant based culture starter 1 packet. Start with less and work up to if you need to add more. unless you like a super tart sour cream!
Protein powder; 2 scoops of any protein powder you like organic pea, hemp, brown rice, lentil, or non-GMO soy. (hemp and brown rice are the least allergenic if those are your considerations.)
To the 1 litre of plant milk that only supplies 1-2 grams of protein per serving, the addition of a plant protein powder adds apx 9 grams of protein per serving, with the 1 gram gained from plant milk per cup (1 serving size) this jacks up the protein to 10 gram per serving, which matches or even surpasses a per serving of dairy yogurt.
Sweeteners; Agave, dates, or stevia, or (honey) are natural sweeteners that I would suggest to add in small amounts to the final product but if you want to add to the recipe remember that less is more.
DIRECTIONS;
1. Heat the plant milk in a sauce pan on the stove at medium heat, whisk in your thickener , sweetener (if any), and flavours at this time, heat and whisk for 5-10mins. You want the milk to steam but not to boil. You will see the milk thicken throughout this time. (remember that it should thicken even more after being chilled in the fridge).
2.Turn the element off and add the protein powder, whisk well so that it is consistently blended. Leave it to cool for 20 mins.
3. Test the temperature, I don't have a thermometer so I do the finger test. I stick the finger in and if I feel I need to pull it out immediately, it's still too hot. If I stick it in and it's hot but the finger can handle it, the temp is somewhere between 100-110 degrees Celsius, perfect for the culture to be whisked in.
4. Whisk 2 probiotic tablets into the milk that you can officially call yogurt now.
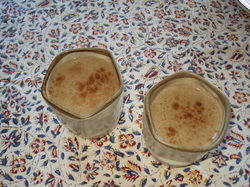
5. Cover your glass container with a clean tea towel and place it in the oven with the light on. This should keep it just warm enough to keep the culture happy and growing.
6. Leave it to culture anywhere from 6-9 hrs depending on the way you like your yogurt. The longer you leave it the tarter and more cultured it will become. But I warn you not too leave it too long or it will start to smell like yeasty cheese and your boyfriend will complain of bad smells in the kitchen!
7. When it is finished to your satisfaction, place a air tight lid on the container(s) and keep it in the fridge. This will last up to 5 days. Remember that you have just made a fresh product with no preservatives so it will not last as long as store bought, and better for you that it doesn't!
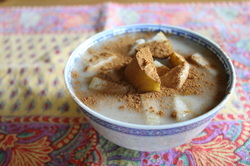
Note on flavouring; Get creative, get inspired, My favourite is plain coconut milk with vanilla and cinnamon. I'll throw a banana in the mix sometimes, or dice up a pear that is the perfect flavour pair with the cinnamon.
Don't be disappointed if it doesn't work out perfectly the first time! I've read so many different recipes with times and quantities, every kitchen, oven, ingredient will blend together slightly differently. Realize that nothing is a waste! If it seems to be a sloppy mess but tastes okay, put it back in the sauce pan, add a 2 more tablespoons of thicker on med heat for 5-10mins to make it a good consistency and throw 2 more tbsps of probiotics in after it has cooled, but at this point put it directly in the fridge and skip the hrs of culturing. You will still come out with a product that has probiotic and it's a no fail no waste!
Enjoy the adventure!
1. Heat the plant milk in a sauce pan on the stove at medium heat, whisk in your thickener , sweetener (if any), and flavours at this time, heat and whisk for 5-10mins. You want the milk to steam but not to boil. You will see the milk thicken throughout this time. (remember that it should thicken even more after being chilled in the fridge).
2.Turn the element off and add the protein powder, whisk well so that it is consistently blended. Leave it to cool for 20 mins.
3. Test the temperature, I don't have a thermometer so I do the finger test. I stick the finger in and if I feel I need to pull it out immediately, it's still too hot. If I stick it in and it's hot but the finger can handle it, the temp is somewhere between 100-110 degrees Celsius, perfect for the culture to be whisked in.
4. Whisk 2 probiotic tablets into the milk that you can officially call yogurt now.
5. Cover your glass container with a clean tea towel and place it in the oven with the light on. This should keep it just warm enough to keep the culture happy and growing.
6. Leave it to culture anywhere from 6-9 hrs depending on the way you like your yogurt. The longer you leave it the tarter and more cultured it will become. But I warn you not too leave it too long or it will start to smell like yeasty cheese and your boyfriend will complain of bad smells in the kitchen!
7. When it is finished to your satisfaction, place a air tight lid on the container(s) and keep it in the fridge. This will last up to 5 days. Remember that you have just made a fresh product with no preservatives so it will not last as long as store bought, and better for you that it doesn't!
Note on flavouring; Get creative, get inspired, My favourite is plain coconut milk with vanilla and cinnamon. I'll throw a banana in the mix sometimes, or dice up a pear that is the perfect flavour pair with the cinnamon.
Don't be disappointed if it doesn't work out perfectly the first time! I've read so many different recipes with times and quantities, every kitchen, oven, ingredient will blend together slightly differently. Realize that nothing is a waste! If it seems to be a sloppy mess but tastes okay, put it back in the sauce pan, add a 2 more tablespoons of thicker on med heat for 5-10mins to make it a good consistency and throw 2 more tbsps of probiotics in after it has cooled, but at this point put it directly in the fridge and skip the hrs of culturing. You will still come out with a product that has probiotic and it's a no fail no waste!
Enjoy the adventure!

 RSS Feed